Melty Blood Installation Guide
by TheXev

Have you had issues installing Melty Blood on your English Windows XP system? This guide is designed to walk you through, step by step, in the process of installing Melty Blood on an English Windows XP system. Advanced users can easily skip simple steps, but I have included nearly every mouse click to make this as simple for non-advanced users as possible! First you will need the following tools:
- Your Windows XP installation disk (unless you know your installation files are on your hard drive)
- Melty Blood installation CD
- Microsoft AppLocale
With the following tools in hand, let us begin! The first key step is to install Japanese Language support. Without it, you cannot carry out Melty Blood's installation correctly. With your Windows XP installation CD in hand, carry out the following steps!
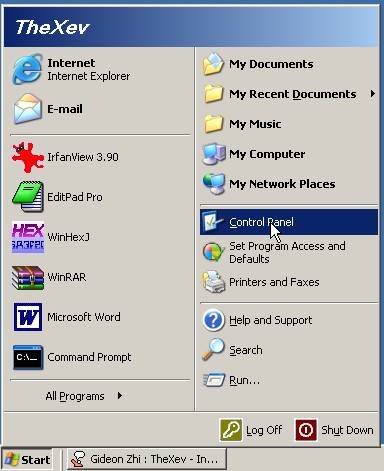
Step 1a (XP Desktop mode). Click on start and find Control Panel, click on it.

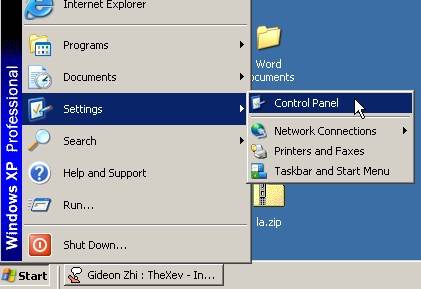
Step 1b (XP Classic Desktop mode). Click on start, then settings, then on your control panel.

Step 2. With the control panel open, make sure you are in "Classic View", and then find "Regional and Language Options." Double click this to open your Regional settings.


Step 3. Click on the "Languages" tab, then check the box "Install
files for East Asian languages." You will be then presented with
a warning telling you that the feature will require 230MB of disk space.
Click okay. Now click "apply." You will be asked for your Windows
XP installation disc. Insert it into your CD-ROM drive and make sure the
correct location is set and click okay. Windows will copy the files it
requires and ask you to restart your computer. Go ahead and restart.


Step 4. Now that your machine can support Japanese text when it requires it, you can now install Microsoft AppLocale. Run applocale.msi and follow the steps to install it (it is very simple).
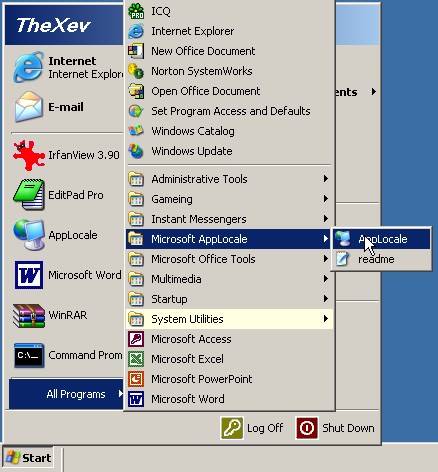
Step 5a (Windows XP Desktop). Run AppLocale by selecting "All Programs", "Microsoft AppLocale", then "AppLocale."

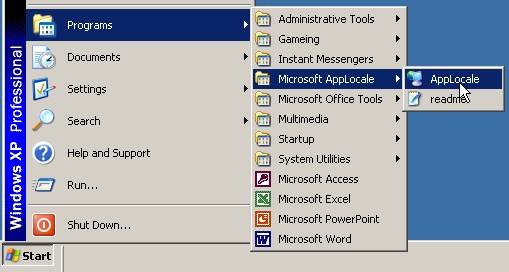
Step 5b (Windows XP Classic Desktop). Run AppLocale by selecting "Programs", "Microsoft AppLocale", then "AppLocale."

Step 6. Insert your Melty Blood installation CD into your CD-ROM drive. Hold your left shift for several seconds to stop the autoplay installation from starting (this can also be used to stop any autoplay function). Now in AppLocale, hit next to bring up this Window.

Click browse and find the location of setup.exe and select it. Click Open

Step 7. With setup.exe selected, click next in the wizard to bring up this screen. This is where you will select the language you want the program to run in.

We want it to run in Japanese, which is at the very bottom of the list!

Now click next to move on!

Step 8. In the next screen, you can select "Create a shortcut to always run this application with AppLocale." This will create a shortcut with whatever name you decided on, in the Microsoft AppLocale folder. It might be a good idea to make a short cut if you make a mistake during the installation of Melty Blood, but its not nessisary.

Click Finish and Melty Blood's installation will begin!
Step 9. You will now be presented with Melty Blood's installation in its pull Japanese glory. The first thing you may with to do is change the installation folder from its default which is C:\Program Files\渡辺製作所\MeltyBlood. To do so, click the (R) button now

You can replace 渡辺製作所 with "Watanabe Works" or "Watanabe Productions," whatever floats your boat. Make your change and click OK.

You will be presented with a warning. My best guess is that it is telling you the folder does not exist, and it is asking if you would like to create it. Click yes.

Now click ![]() (next) to continue.
(next) to continue.

Melty Blood's files will now copy over to your computer!

Click ![]() (finish)
to complete Melty Blood's installation!
(finish)
to complete Melty Blood's installation!

Step 10. Now you will notice that Melty Blood as installed its shortcuts to a folder called 渡辺製作所. You can right click on this folder and rename it to "Watanabe Works" or "Watanabe Production."

You can also rename the other shortcuts to be something you can understand in English!

*note, if you uninstall Melty Blood, do it using AppLocale + Add/Remove programs, and not this shortcut!
You can also create a shortcut to run Melty Blood with Japanese text support!
With all of these things taken care of, you have now successfully installed
Melty Blood!
This site is designed for use with Mozilla Firefox:
|
Original site designed by Venatyr. NEWSITE designed by JaggedDragon 

|

|